
How to Switch NEMT Software: A Step-by-Step Guide
Your vendor announces it's retiring the platform you've used for a decade. A new broker contract needs a connection your current system can't make. Or you've grown from 12 vehicles to 40, and software that was just fine before can no longer keep up: a dispatcher now schedules until nine every night and copies trips between screens by hand.
Those are the usual reasons a provider switches. The worry that follows is almost always the same: what happens to our data, our standing orders, our broker trips, and our drivers in the middle of it? All of it carries over when you switch NEMT software. What matters is the order you do things in.
Contents:
- What Switching NEMT Software Actually Involves
- Step 1: Set Your Go-Live Date Around Your Contracts
- Step 2: Export and Clean Your Data Before You Cancel
- Step 3: Rebuild Rates, Payers, and Standing Orders
- Step 4: Reconnect Your Brokers One at a Time
- Step 5: Train Dispatchers First, Then Drivers
- Step 6: Go Live
- Step 7: Review Your Numbers at 30 Days
- Conclusion
What Switching NEMT Software Actually Involves
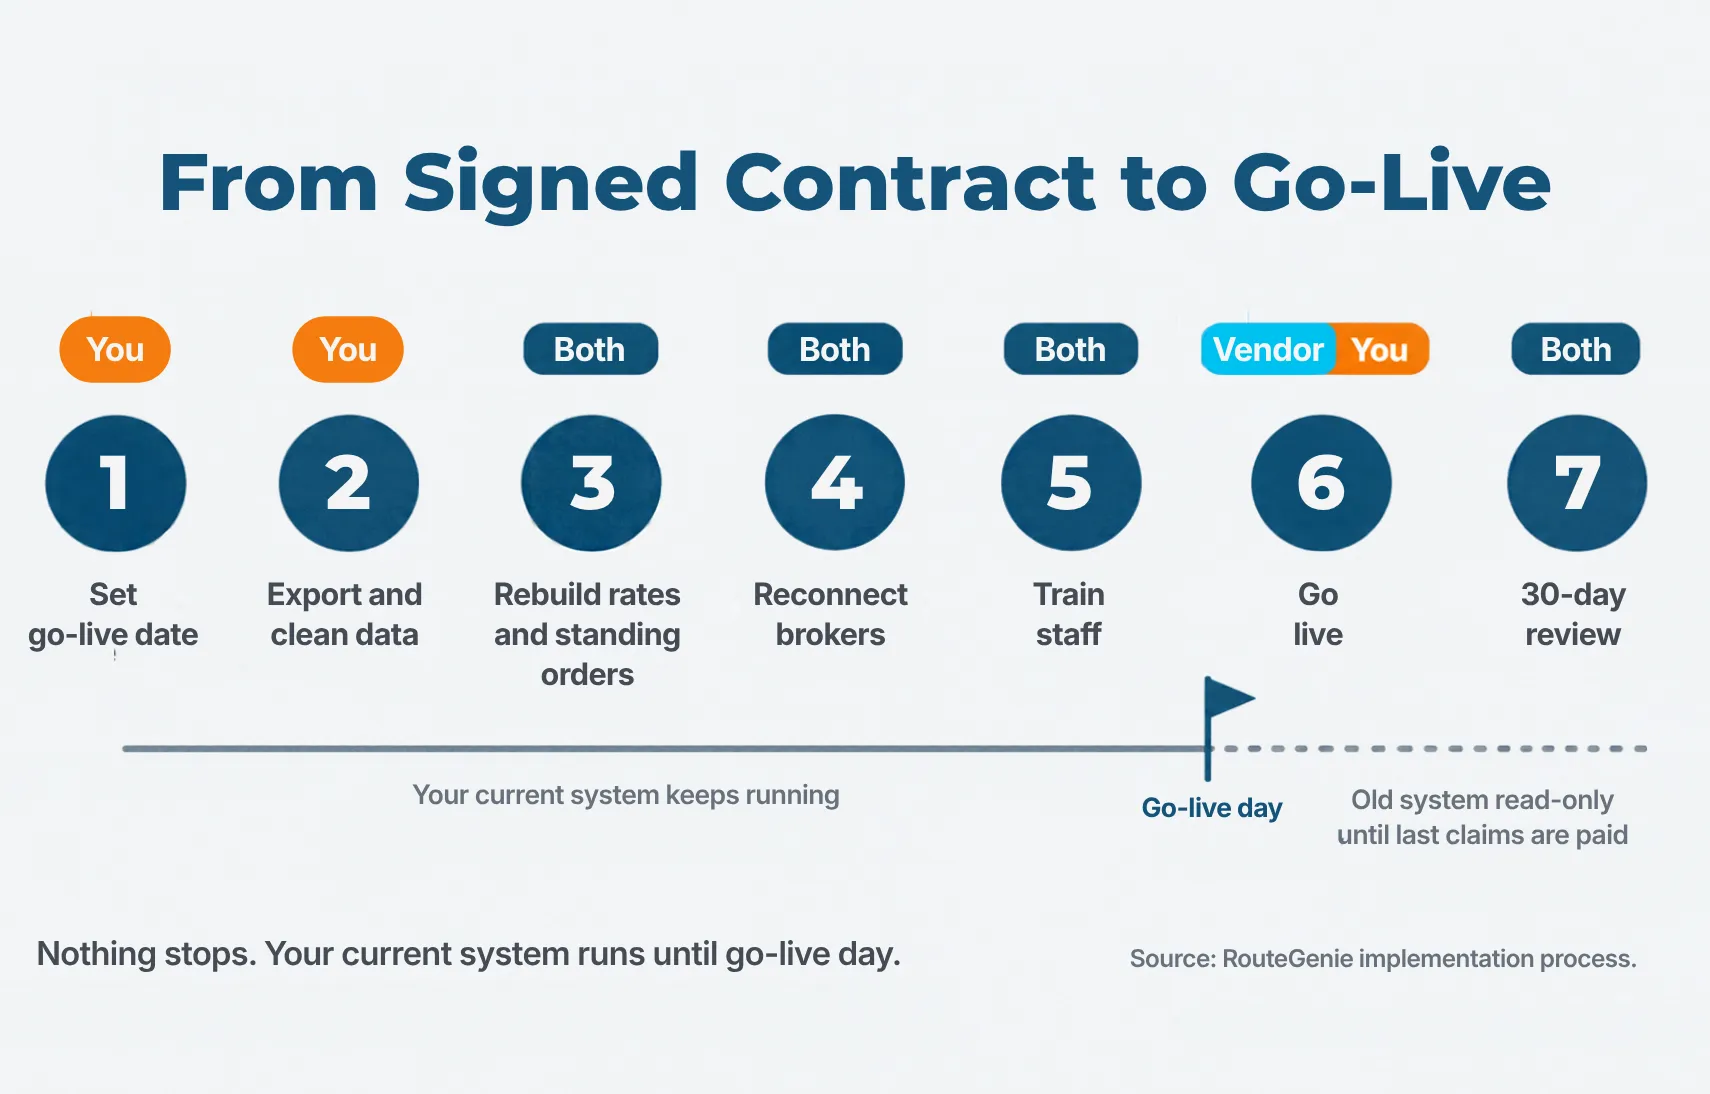
A switch is a few weeks of setup alongside your normal operations, then one go-live day. Your current system keeps running until then. How long the setup takes depends less on fleet size than on how many brokers, locations, and billing entities you need to connect:
|
Fleet |
Operation |
Typical time to go-live |
|
2 to 5 vehicles |
Owner dispatches, one broker or private pay, little history to move |
1 to 2 weeks |
|
10 to 30 vehicles |
One office, 1 to 2 dispatchers, 2 to 3 brokers, standing orders to rebuild |
4 to 6 weeks |
|
40 to 100 vehicles |
Several locations or billing entities, a dispatch team, 3 or more brokers, years of history |
6 to 8 weeks, often with a staggered go-live |
|
Broker or health plan |
Eligibility files, provider network, claims workflow, state approvals |
60 to 90 days |
You handle the exports, the cleanup decisions, and staff time for training. The vendor handles the imports, configuration, broker connections, and the training itself. At RouteGenie, that comes in two forms with every subscription:
- Pro Implementation is consultant-led. About 10 hours of live sessions where a consultant builds your users, vehicles, payers, pricing, passengers, and facilities with you, then trains your team on scheduling, dispatching, the driver app, billing, and reporting.
- Guided Launch is for smaller teams with simpler setups. You configure the essentials in RouteGenie Academy, then a consultant reviews the configuration and runs about 4 to 5 hours of live training and launch support.
One consultant stays with you from kickoff through go-live either way. If you haven't picked a vendor yet, start with what to compare in NEMT software.
Step 1: Set Your Go-Live Date Around Your Contracts
Start with your current software contract. Most run on a 12-month term, require written notice 30 to 90 days ahead, and auto-renew if you miss the window. Leaving mid-term usually means an early termination fee, so the cheapest switch ends with the contract. Find the renewal date and work backward from it.
Avoid going live during month-end billing close. If a broker change or a vendor shutdown is forcing the switch, that date is your deadline, so leave a buffer before it.
Set two dates, not one:
- Go-live: the day trips start running in the new system.
- Fully off: a few weeks later, when the old system is closed. The gap gives you time to bill out the last trips and pull any export you missed.
Step 2: Export and Clean Your Data Before You Cancel
What to Request From Your Current Vendor
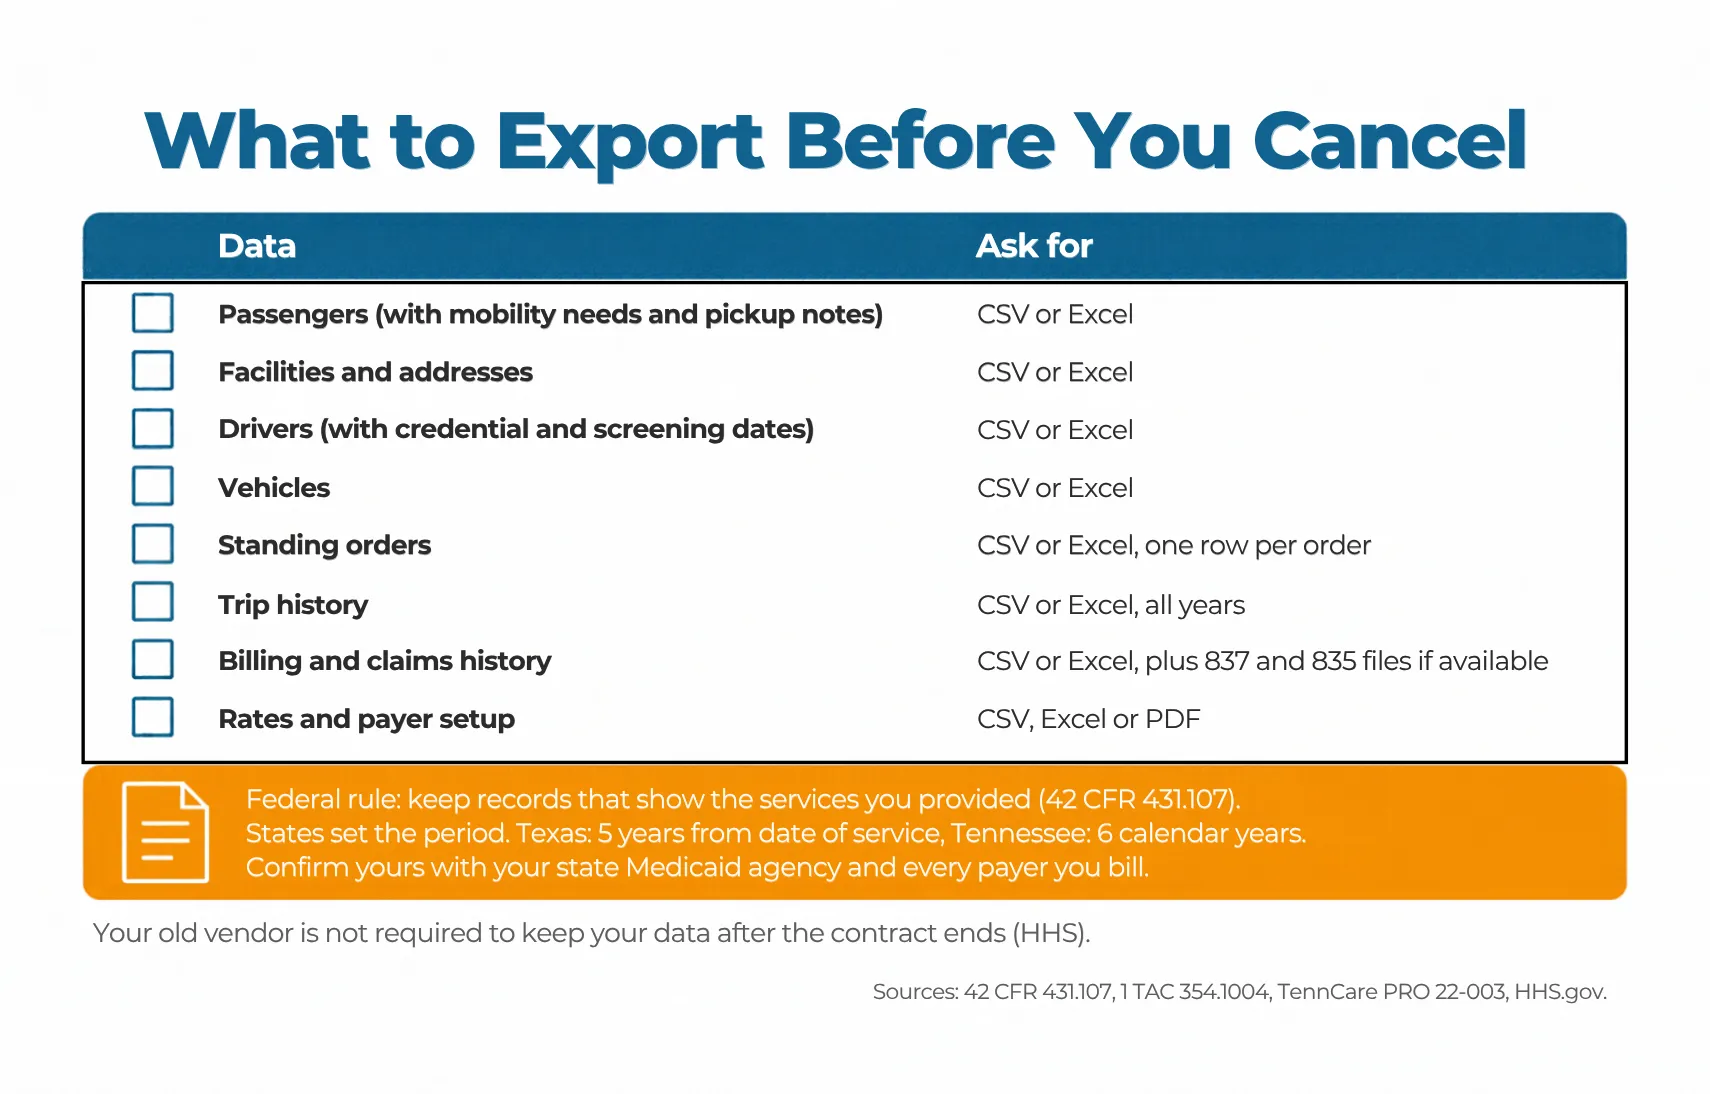
Data migration starts with the export, so ask for everything in a format you can open in a spreadsheet. PDF report packs look complete but can't be imported anywhere. Request CSV or Excel exports of:
- passengers, including mobility needs and pickup notes
- facilities and their addresses
- drivers, with credential and screening dates
- vehicles
- standing orders
- trip history
- billing and claims history
- rates and payer setup
Also ask how long you keep read-only access after cancellation. That sets your export deadline.
How Long to Keep Your Old Trip Records
Federal Medicaid rules require every provider to "keep any records necessary to disclose the extent of services the provider furnishes to beneficiaries," under 42 CFR 431.107. Each state sets the retention period. Texas requires five years from the date of service, or until any audit questions are resolved, whichever is longer, under 1 TAC 354.1004. Tennessee's NEMT policy PRO 22-003 requires six complete calendar years for driver records, trip records, and reports. Those are two examples, not a rule of thumb. Periods vary by state, program, and broker contract, so confirm yours with your state Medicaid agency and each payer you bill before you set an export date.
Your old vendor won't keep those records for you. HHS guidance states that "the HIPAA Rules generally do not require a business associate to maintain electronic protected health information" once it stops providing services, and that the business associate agreement must require the vendor to return or destroy PHI at termination where feasible (HHS FAQ). Download your history before access ends and store it somewhere you can search when an auditor asks.
Clean It on the Way In
Many systems never assigned riders a unique ID, so the same person can exist three times under different spellings. Merge them. Standardize facility names so one dialysis center isn't listed four ways. Keep facility and pickup addresses in separate fields, because a facility address hard-coded onto a trip overrides the real pickup and throws off mileage and claims. Archive riders who haven't traveled in a year.
Step 3: Rebuild Rates, Payers, and Standing Orders
Rates come first. Pricing rarely maps one-to-one between systems, so expect to rebuild your rate tables by hand, whether that's a flat pickup fee plus mileage, rates by county, or tiered broker pricing. Then test them: price ten recent trips in the new system and compare the totals to what you actually billed.
Standing orders come next. If your old system made you re-enter the same recurring trips every day, this is where the switch pays off: a template-based system generates months of trips at once for a dialysis rider going three days a week. Rebuild them in your new NEMT scheduling software, then check the four cases that usually break:
- riders who go every other week
- trips that land on a holiday
- orders with no end date, or one coming up soon
- riders who must always go with the same driver
Finally, generate one week of trips and compare it rider by rider against the old system.
Step 4: Reconnect Your Brokers One at a Time
Know How Each Broker Sends Trips
Brokers hand off trips in different ways: through an API, through a portal file you import, or through their own driver app that you must use no matter which software you run. MACPAC counted 35 states using a broker for at least some populations or regions in 2021, so most providers have more than one connection to rebuild. List them before go-live, with the method and a contact at each. What shortens this step most is software that already connects to your brokers. RouteGenie integrates with most of the major ones, so reconnecting is configuration, not development.
Test, Then Phase In Live Volume
Run a test import from each broker and check the fields that cause trouble:
- Pickup time vs. appointment time. Some feeds send one, some both. Import against the wrong one and your driver is at the door an hour late.
- Trip notes. Apartment numbers, stairs, and mobility needs should come across intact.
- Cancellations. A broker cancellation should cancel the trip in your system.
- Completion data. Confirm it flows back to the broker.
Then go live with one broker's volume first, run it for a few days, fix what surfaces, and add the next. Our broker integration overview shows what a connection looks like once it's running.
Step 5: Train Dispatchers First, Then Drivers
Train the office before the road. Dispatchers and billing staff are in the dispatch software all day and will be answering driver questions on day one. Pick one or two as go-to experts and give them extra time with the vendor.
Drivers need less training, but they need it before the first shift. Install the driver app on every phone ahead of time and test each login. Assign drivers to their vehicles so nobody starts a shift in the wrong van. Hand out a one-page guide with the four or five taps a trip takes, and give less tech-comfortable drivers an in-person walkthrough the week before.
Step 6: Go Live
Run Both Systems or Switch Over Cleanly
A shadow week means running both systems for a few days and comparing schedules leg by leg. It suits larger operations and anyone with a broker that can't afford a missed trip. A clean cutover means picking a morning and running everything in the new system from then on. It suits smaller fleets that have already tested imports and standing orders.
Bill Trips Around the Cutover Date
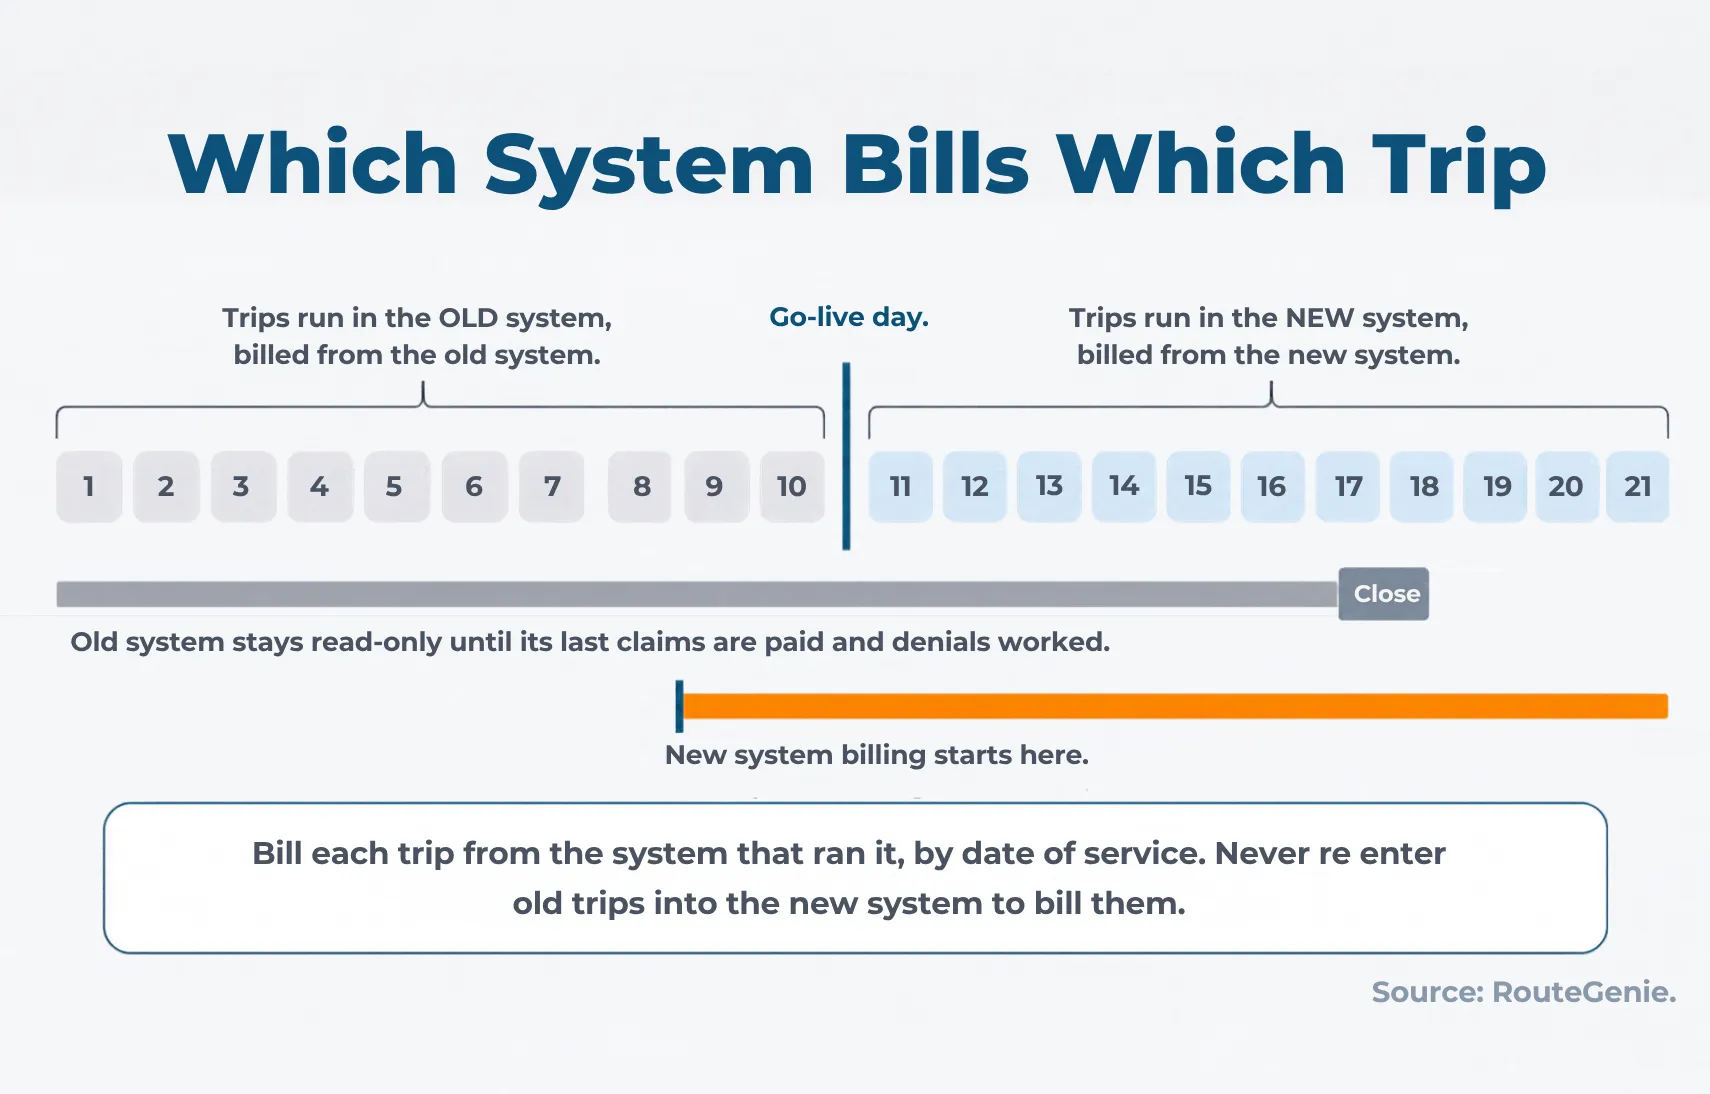
Bill each trip from the system that ran it, by date of service. Don't re-enter old trips into the new NEMT billing software to bill them there, because the completion data, signatures, and odometer readings stay with the original record.
Keep the old system until its last claims are paid and any denials are worked. Then close it.
Every morning of the first week, check:
- trips still unassigned
- drivers who couldn't log in
- trips imported per broker, against what the broker says it sent
- your first claim batch
Step 7: Review Your Numbers at 30 Days
Before you switch, write down last month's figures for:
- on-time performance
- unbilled trips
- denial rate
- trips per vehicle-hour
At day 30, pull the same numbers from the new system. A dip in on-time performance usually points to a standing order or broker import that still needs fixing; a rise in unbilled trips usually points to a rate table. Our on-time performance tips cover what to check if the first number moved the wrong way.
Conclusion
Switching NEMT software comes down to doing things in order: export, clean, rebuild, connect, train, go live, review. RouteGenie's implementation consultants run that sequence with you, whether you choose Pro Implementation or Guided Launch. Book a demo to see how it works.
About the author


Serhii Taborovskyi is the founder and author of the Automotive Territory YouTube Channel, with 300,000 subscribers and counting. He is an avid automotive enthusiast and a fan of any and all motorized vehicles. Serhii is a visiting author at RouteGenie, sharing his expertise for the benefit of the NEMT community.